What's new in Camtasia 2021: All the new features, functions and improvements

As you probably know, Techsmith releases major versions of their software every year, around springtime, and this year is no exception: Camtasia 2021 is releasing in a few weeks.
There are quite a few new features, functions, improvements and workflow tweaks included in this version. In this article I'm walking through the major new features of Camtasia 2021, one by one.
Some of the features have been requested for a long time by the Camtasia users community, there are also some interface tweaks, new functions and optimisations.
When will camtasia 2021 be released?
Camtasia 2021 releases on April 27th, 2021. If you don't have Camtasia 2021, you can download a free trial version from this link, when it releases. If you're reading this before the launch date, the link will take you to the current Techsmith website, but if it's after April 27th, feel free to click it to download Camtasia 2021.
In my next few videos and articles, ahead of the launch, I will also be covering each of these new functions in detail, so please subscribe to my YouTube channel.
So, let's have a look at the most important new features in Camtasia 2021:
1. Redesigned Startup Screen
Camtasia 2021 has a new, re-designed startup screen. It has pretty much the same options as the previous one, and you've got options such as: New project, New from template, New recording, and Open an existing project.
Obviously some learning resources and some help links that take you to the online help. I don't notice new functionality here, it's just better organised.
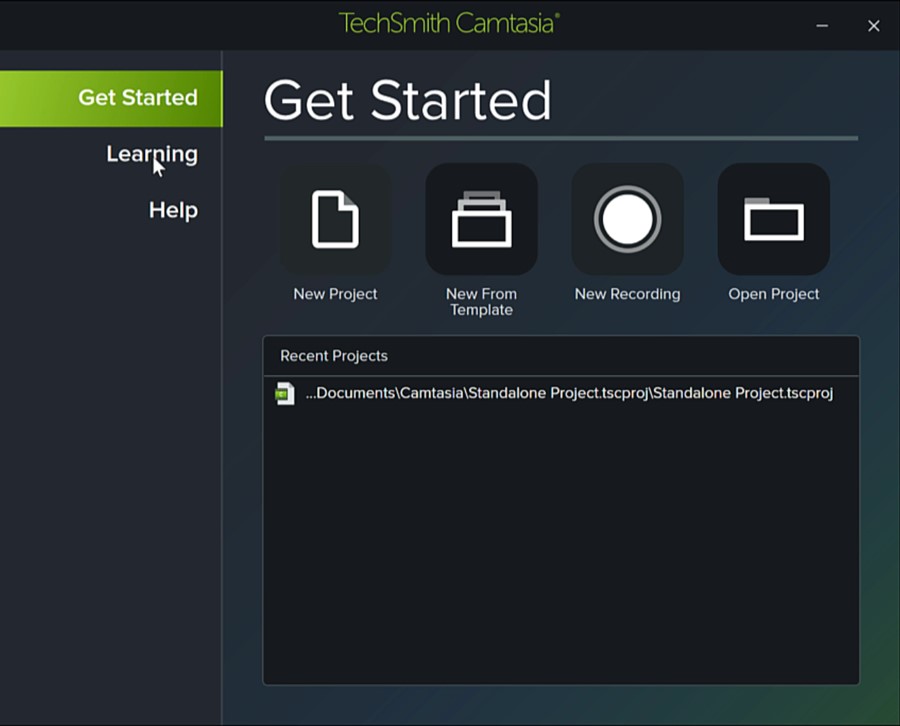
Camtasia 2021 sports a redesigned startup screen
2. New screen recorder
The Camtasia 2021 screen recorder is different. It seems to have lost some of the options that you had with the previous recorder. All you have in the 2021 version are the four different panels. They are a bit larger and you've got the recording area that you can define, the camera turn ON and OFF, the Microphone and System Audio, which you can also enable from the Capture menu in the top-left corner of the window.
If you choose to record full screen, you have a very limited set of options here. You've got the widescreen and the HD versions and the full screen. And then, if you want to choose a region you can click Choose region, and then you can drag the region you want to capture.
If you wish to constrain the defined region to 16:9, you must hold down the Ctrl key and it will have that aspect ratio.

Re-designed screen recorder interface in Camtasia 2021 has lost some of the advanced options and menus
If you are disappointed that the new re-designed recorder is missing the options, settings and preferences menu, Techsmith have said they are working on bringing those back in the very near future. They have also bundled the old recorder along with the installation of Camtasia 2021. Here's a video on how to use the old Camtasia recorder, in the 2021 version, while you wait:
3. 75 new transitions built into Camtasia 2021
So when you start a new project and you go to Transitions on the sidebar. If you have some media loaded, you will see that you have much more transitions here. It's almost very hard to browse through them. I'll be making a video on my channel showing all of these transitions one by one.
In Camtasia you can filter them by transition type: 3D, blurs, divisions, fades and so on. So you can at least filter them down a bit. Apart from this, the new transitions work the same way as the older ones. You just drag them between two clips and there you go. So obviously you're going to have to explore these on your own.
I'll also record a video about the transitions soon and show case all of them on my YouTube channel, if you don't have Camtasia 2021, just so you can check them out.
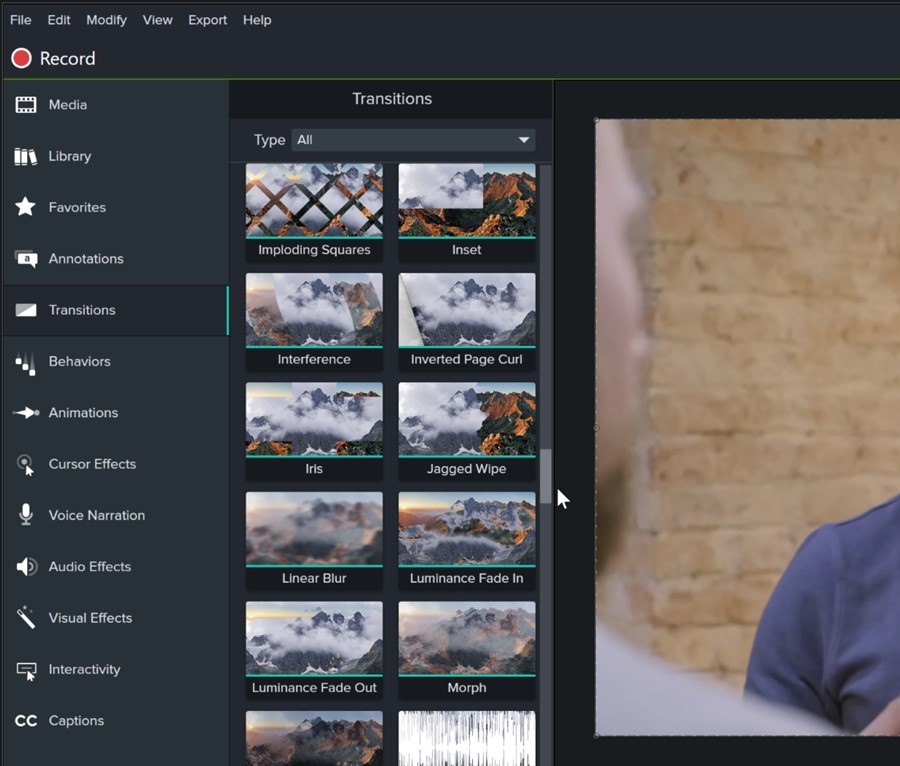
Camtasia 2021 has 75 new video transitions you can choose from, organised by type
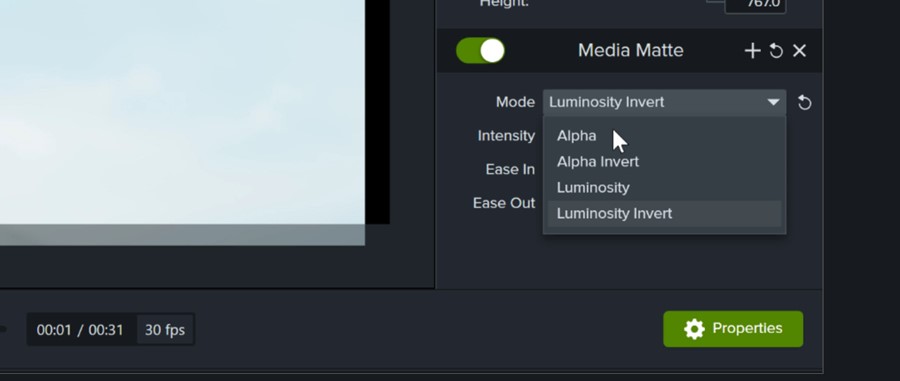
4. Media Matte Effect
Another cool visual effect that was added in Camtasia 2021 is the media matte effect. So if go to Visual effects you will find Media Matte. Now the media matte works with another object that you place above your clip.
For example, if you go to an annotation and let's suppose I want to use maybe a shape like a star, you put it on top of your clip, on a separate track. Watch what happens now, if you wanted your video to be visible all the inside of this shape, maybe have a circle of video in a circle, like a talking head kind of thing, you had to do all these funny steps and effects with the track mattes.
You have to put the mask object on top of the other track and you needed to right-click on your track and change its Track Matte mode to Alpha or Alpha Invert or any of the other types, depending on the effect.
Well, using the Media Matte Visual Effect in Camtasia 2021, this is very easy to do now, and you don't have to change your tracks anymore.You just go to Visual effects, and you use media matte and you apply this to the object that you want to become a mask. So if you drag it on top of the star, you immediately see the effect was added.

The Media Matte Visual Effect in Camtasia 2021 adds flexibility to masks, without having to use Track Mattes
So now my video below is inside of this area because it is a matte, without affecting your tracks.
And you can move this object around, of course, and your mask will move with it. You can also move your bottom clip, if you want to move that one and the effect will still work. This media matte gives the same options, just like you used to have it in the Tracks Matte, where you right-clicked on the 'eye' icon: all these things are actually available now on the media matte property panel:
Media Matte effect options are similar to Track Mattes, with a few extra tweaks
So by default, you have the Alpha mode. You can change the intensity to turn it into a highlight, just like the usual highlight/spotlight annotation that you had in Camtasia, but also you can change this to be something else like alpha invert, which means it's going to cut out that part from the video underneath.
And it will just kind of hide it. Now. Alpha might be the most useful here because you can quickly mask objects inside of a shape.
This doesn't have to be just a shape. I have an image here with my logo on it and I can turn this into a mask for the clip below. So all I have to do is just go to visual effects, drag the media matte on top of this, and it becomes a mask:

You can use any image or object and apply the media matte effect to turn it into a mask
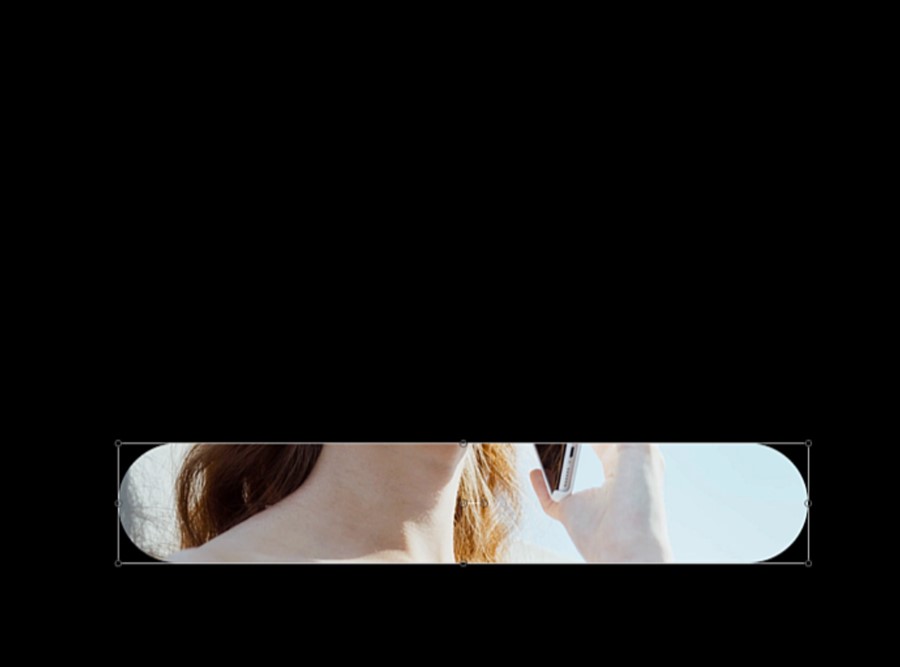
A clip with a media matte effect applied to it becomes a mask
My image happens to be a PNG with transparency and rounded corners. So you can see now that my image has become a mask, you know, you can play with this any way you like, but the idea is that you can quickly now mask objects using this track matte inside of a shape.
You can select everything and group it. You've got an element within a group with a mask applied to it that you don't have to worry about changing the track blending mode or the track matte itself. You're now free to move this group around and do whatever you like, the effect will be preserved inside of the group.
5. Motion Blur for Animated Clips and Objects
Camtasia 2021 introduces motion blur. This is a visual effect you can add to a clip on your timeline when you animate it. It is an effect that depends on the animation, specifically the animation speed.
You can add this to any clip, for example an annotation with texts on it. When it's animated without this effect, it's moving, you can't see any blur on this. If you stop between the two end points of this animation, you can notice there is no motion blur here:
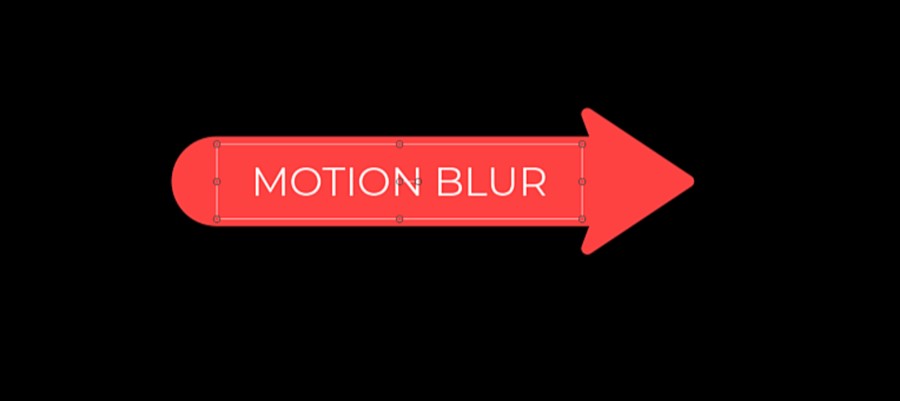
An annotation on the canvas without motion blur effect
...but if you go to visual effects, you have now this motion blur effect, you can use that on your clip. You don't use it on your animation, just on your clip. So it applies for the entire clip.
And notice now that if I'm in the middle of my animation, the item is blurred like that because it's moving. So you can see that it's moving.
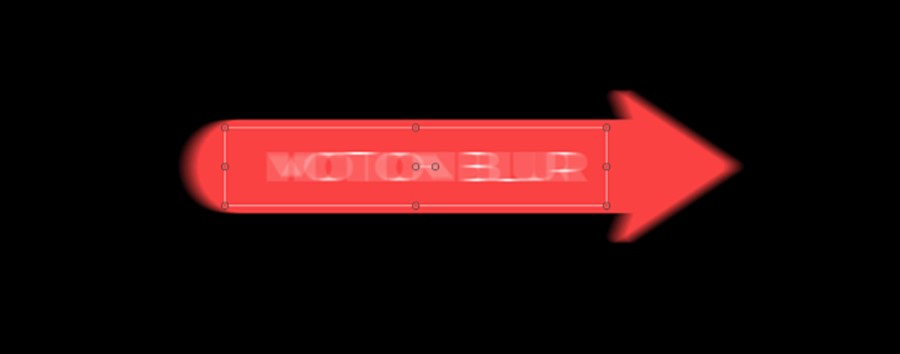
The same annotation with motion blur applied, while it's moving during an animation.
So this gives it a bit of a realistic movement effect, and this works also for images.
This is a simple image that I'm moving from left to, right. If I have the motion blur effect to it, you will see it's blurred. The only difference you're going to have here, the option panel here is going to allow you to change the intensity of the blur effect. This is subject to the animation, so you may want to do this before you animate, because it adds a new animation key frame when you have an existing animation on that clip already. This means that the motion blur is a property you can animate.
If I'm the middle of the animation. I have the motion blur effect added to my object. I can put the intensity all the way up and then I will add an animation to my object and move it to the right, just to generate a movement. Now that I am in the middle of the animation, I have blur.
The motion blur effect in Camtasia 2021 is influenced by the speed of your animation. If you make the animation shorter, you will see that the blur effect intensifies. The faster you move your objects on screen, the longer the blur effect will be. So this will give you quite a nice, realistic effect.
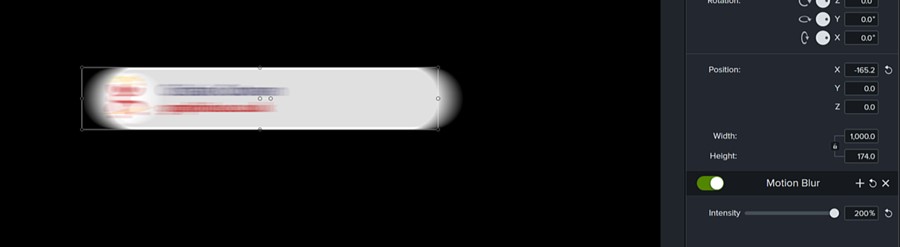
Motion blur effect applied to an animated image in Camtasia 2021
6. Proxy Videos Editing
Another cool feature that was requested by many users on the Camtasia forums was to be able to create proxy videos, mainly due to performance reasons. Most video editing software out there have this now, as video clips get larger and larger with ever-increasing resolutions and framerates.
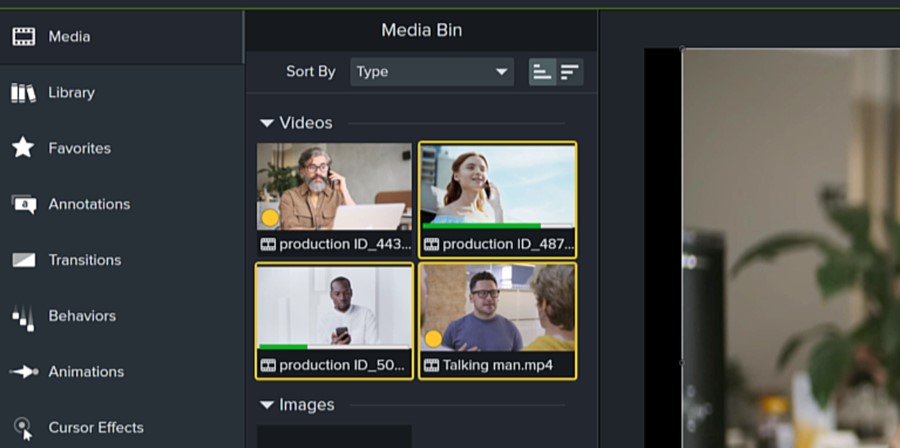
So this has now been added to Camtasia. I have some clips here on my media bin, so I'm just going to drag all of them to my timeline. Some of these clips are 60 frames per second. So this is going to be very helpful for you when you're editing higher resolution videos or you have a lot of clips and Camtasia is kind of slow.
When I'm scrubbing through my timeline, my video is not smooth at all. In fact, it's very choppy and the more I go in it takes like a second for it to update. So this is obviously not a very good editing experience. So naturally you would like to have proxies to work with. The proxy is actually a lower resolution clip from your main clip that is linked right in the timeline.
And you can preview, you can edit, you're gonna apply effects and everything to it, and everything's gonna move smoothly, until you are ready to export, in which case it's going to export with the actual full resolution videos. So this is going to make your editing much faster. If you have clips on your timeline and you want to use the proxy feature, all you have to do is locate the videos in the media bin, select the video clip, you right-click on it and you say Proxy video > Create proxy video.
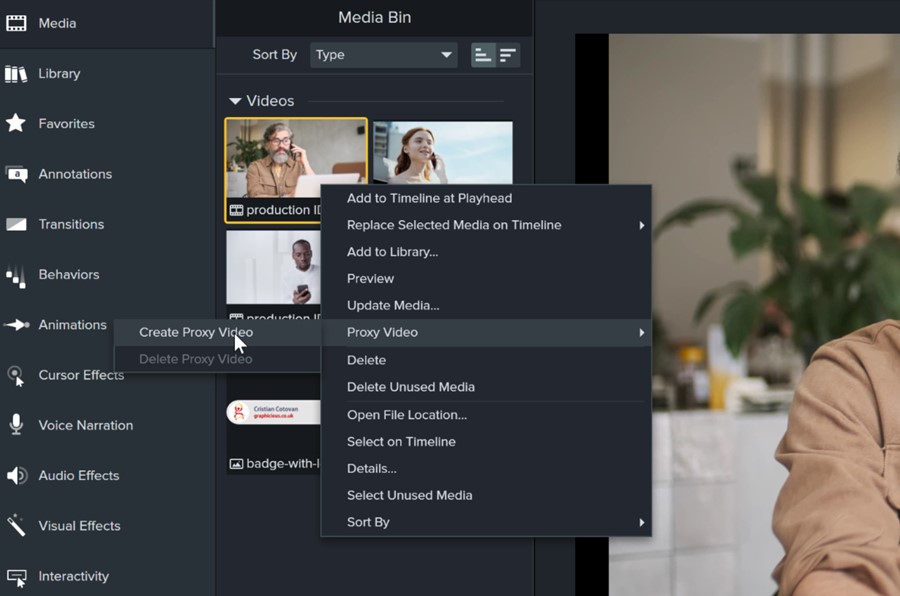
Create proxy videos in Camtasia 2021 to help with smoother editing, right in the media bin
And it's going to take a few seconds. It's actually surprisingly fast. You can see the progress bar on each clip as it creates it. It created a proxy, and now my proxy video has a little yellow circle next to it. And also you can see the same image on the timeline - it has that circle next to the icon of the video.
I'm going to make it proxy for all of these clips. So you can do a proxy for multiple clips at the same time. Right click and do the proxy. You're going to see it's generating these at the same time. The proxies have been generated and you don't have to modify your videos on the timeline. They will be automatically replaced and linked with the proxies and now scrubbing on my timeline is very, very fast. Everything is so smooth on my higher resolution screen. I can see that these clips are a little lower resolution than they are originally, obviously, but you cannot compare this editing experience where you're scrubbing really, really quickly.
So this was a major requirement from the users of Camtasia, because as you add more clips to your project, it becomes slower and slower and slower. And obviously, that's subject to your hard drive speed but this is a massive improvement.
And what I've noticed is that. If you have a clip that you've used in a previous Camtasia project and you've created proxies for it, then if you close it and create a new project, import the same clips from the hard drive location, not from the proxy location, but from the original folder and they already show that they have proxies generated.
So Camtasia remembers where it's saved those references to those proxies, and it keeps those proxies. If you need to reuse clips too, in another project, this is going to be a massive time saver. You bringing them in right as proxies, ready to go.
Videos in media bin that have generated proxies have an orange indicator
7. Corner Rounding Effect
You can now apply corner rounding to your video clips or objects.
So you go to visual effects and you have corner rounding right here. You can drag this on top of your clip and in the right side in the properties, you can change the radius of this rounding and you can see now the rounding is. The rounding can be adjusted with the same value for all corners, or you can turn corners on or off to achieve different effects, you can only round two corners if you want, or just one or whichever you decide to round.
This rounding actually works as a mask. And if you have this clip on top of another clip, you will see that where there are rounded corners around it, you can see through. So you can place your video on top of another one and you can still keep the rounding going.
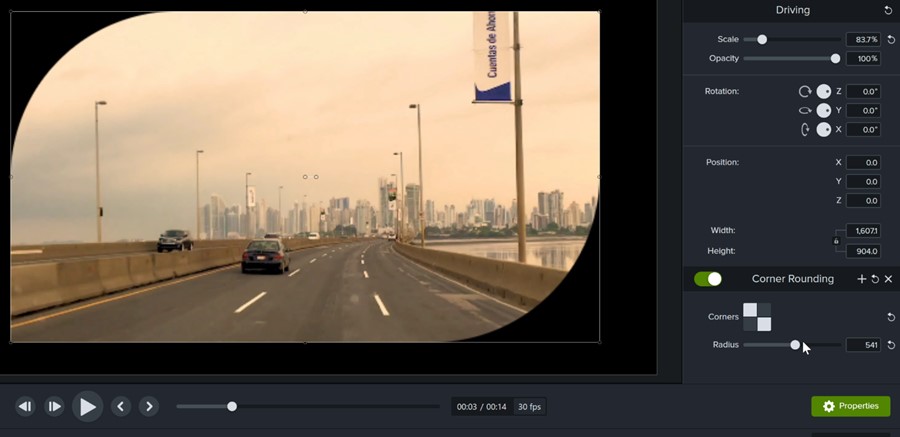
Clips and objects can have their corners rounded in Camtasia 2021
8. Improved Groups Handling and Editing in Camtasia
Camtasia 2021 has improved grouping handling in previous versions of Camtasia. If you had a group of clips or objects on your timeline, like I do have here and I grouped them. If I want to edit the contents of this group, I could double click and the group would just pop open like this, but it would be anything it's in place.
Well, in Camtasia, 2021. You can now have a better group editing. If I have these clips that are grouped here, I can double click and watch what happens if I go inside of the group. Now, the group opens all the way up here and I can edit the contents. And in fact, you have these tabs here now, and it shows you what group you're in and you can edit this group as its own timeline.
And. When you're done editing, you can go back to the main timeline. So you can see your group in here, but you can edit everything inside the group. So this is much more comfortable to work and it's easier to see. And also if you have markers here in here, they will keep, uh, stay. They will stay in this group, but also if you go to the main timeline and you move the group.
Yeah. The markers move with the group. So this is much better to edit because if you had a larger group, it could become very difficult to edit the things inside the group. If it was just opening on the timeline like this, but now with these tab groups, you can go inside and you can edit everything. And you know, that whatever you're doing in here only applies to the group.
It's like Camtasia creates another timeline. Inside the group. So it's just like almost editing another project inside of your main timeline. And if you have multiple groups, watch what happens. You can rename the groups here on the timeline, just like before this is group two. And if you go inside of this group, it opens a new tab.
So you can now switch between these tab groups to make changes. And you know, when you're done, you can close them. And you were back to your main timeline. So this is much more improved right now. So it makes it easy to kind of dial into a specific area of your project.
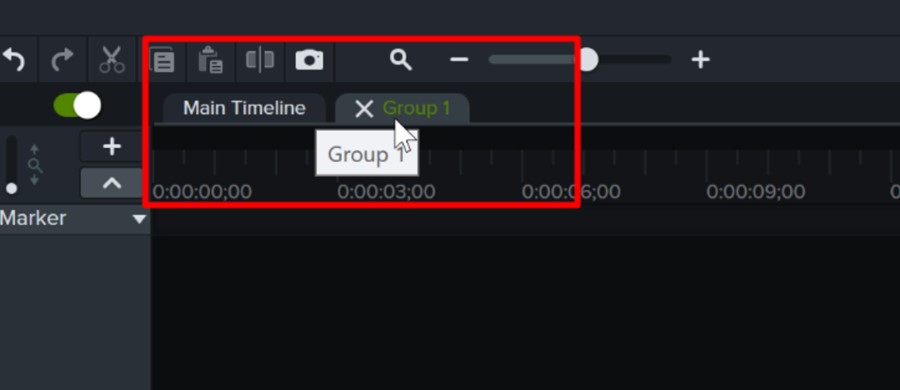
When you enter a group in Camtasia, you edit it in a nice new tabbed interface
9. Resize the Track Headers
Another interface improvement that's been added to Camtasia 2021 is the ability to resize the track header right here in previous versions, like 2020, if you were trying to resize this area, or if you wanted to type a longer name in a track, you could not do that.
So this is my first track. I can't see everything in here because it's being cut off well in 2021, you can actually resize this. Header of the track. And although it doesn't let you resize it as much as you like, like make it really, really wide, at least it's an improvements. And you can type a couple of words in here, so you can actually see what you're doing in here. So this is great.
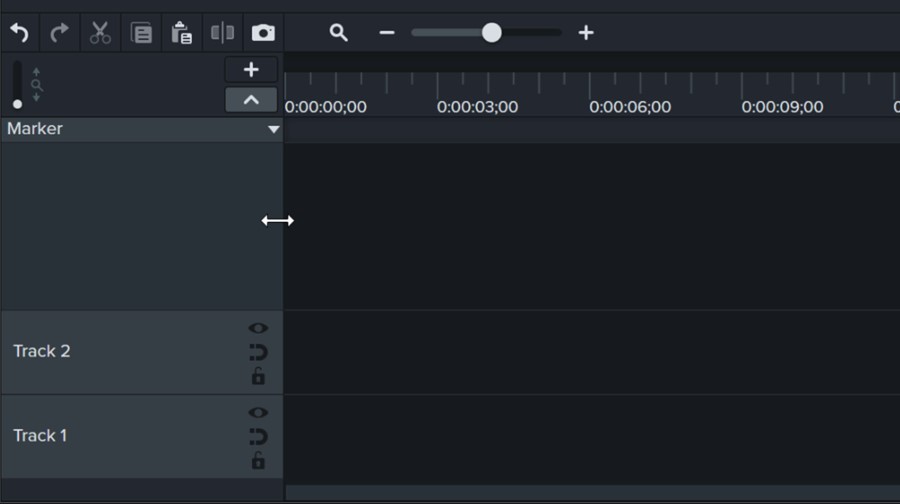
You can resize the track headers in your timeline in Camtasia 2021
10. Add Exported Frame Shortcut Button
There is now a new button on the toolbar here to add exported frame to the timeline. So if you went before, if you went to any point in your timeline and you wanted to grab a snapshot of your current frame and inserted as an image, you can still do that by right. Clicking on the play head right here and selecting add sported frame.
And this is what it does. It just creates a snapshot of the current frame and it adds it here. But now this is much easier. If you just go here and you click on this photo icon, it does the same thing.

Add Exported Frame has its own dedicated button on the timeline toolbar
11. Quick Properties are now exposed and editable
Another great improvement has been the ability to add properties, custom properties and quick properties to annotations and objects like that.
So even it works in groups. So in the previous versions of Camtasia, if you had an annotation with text inside of it, you have to double click to change the name of the text, the content of the annotation. And it was even worse. If you had to reuse this as a, as a reusable component here. It wasn't exposing the text.
So if you are grouping this into a group, you know, you had one group with two annotations here and you wanted to create a reusable asset. Even if you grouped it together like that, you could not change it in the properties here and the text was not available. So you always had to go in to double click, open the group, double click on that, and you get to the text.
Well, okay. In Camtasia 2021, this has been improved. And this is now possible to go to annotations any one of these annotations and you just drag them onto your timeline. Let's say we drag another one in here just as an example. And now if you group these together like this, it becomes a group with two annotations inside.
And notice the text in here. ABC, if you go. To the right panel in the properties. You can see now that you have quick properties. This is another panel here that allows you to change the content of this group separately without having to go into it. And even if you duplicate this, it will give you the ability to resize, to change and do whatever you want.
And the text here, look one, two, three. Four or five, six. So this gives you quick access to all of the text fields inside of the group and all of the annotations that you have even changing the color and the fonts and everything else you can do in here. And each one is now treated separately like that.
And what's more, you can actually click on this here, quick property. Editor to bring up this panel that allows you to even give labels to these properties. So this was something you could do before only on a very limited number of components. Usually those that came with Camtasia and they only exposed these fields and labels through a specific interface just for those ones, because they weren't, there was no interface for you to modify these, but now look, if I want to create one that says, you know, first name, And let's call it, uh, last name, you know, I'm creating labels for this and saving it.
So now these labels appear in the fields on the right side here. And if I'm creating this as a reusable component or reusable asset, I can add it to my library. And every time I bring this into my timeline, right. I have these fields available here for me to customize. So this obviously opens up the door for creating multiple assets.
You can redistribute to your team or share them for free or whatever with other users and what they will come pre-built with all these fields.
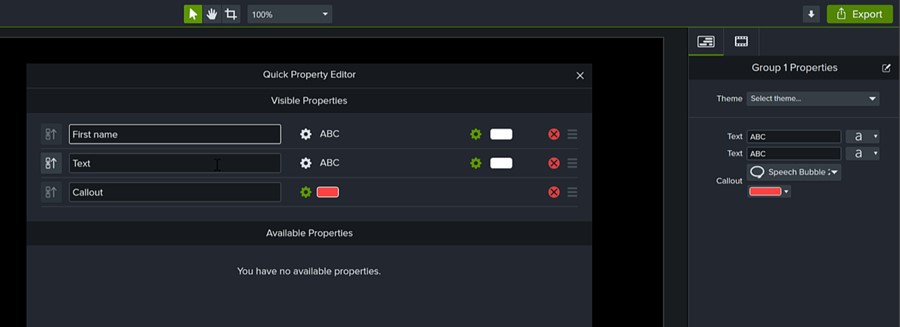
Quick Properties can be added to objects, annotations and can create fillable fields
12. Default Timings for Placeholders
Placeholder timings can now be personalized in the settings. So in previous versions of Camtasia, if you wanted to add a placeholder, if you were creating a placeholder from a video clip that existed before.
So if I have this clip in here, and I right-click and say, I want to convert it to placeholder. The placeholder will have the length of that clip. If you inserted a new placeholder, somewhere on your timeline by pressing P, that would have a one minute default length. In Camtasia 2021 now you can right-click and add a placeholder again, but there is an option now in preferences to change the timing for new placeholders.
This is the only option that's been added here. And all of these options have been reordered to be alphabetical, but the placeholder was not available in previous version. So now, if I want to say all of my placeholders should be maybe 10 seconds long. I can change this option here, click.
Okay. And now if I press P it's going to make a placeholder that is 10 seconds long, only. So that is great. It could be a time-saving feature. If you work a lot with placeholders from scratch.
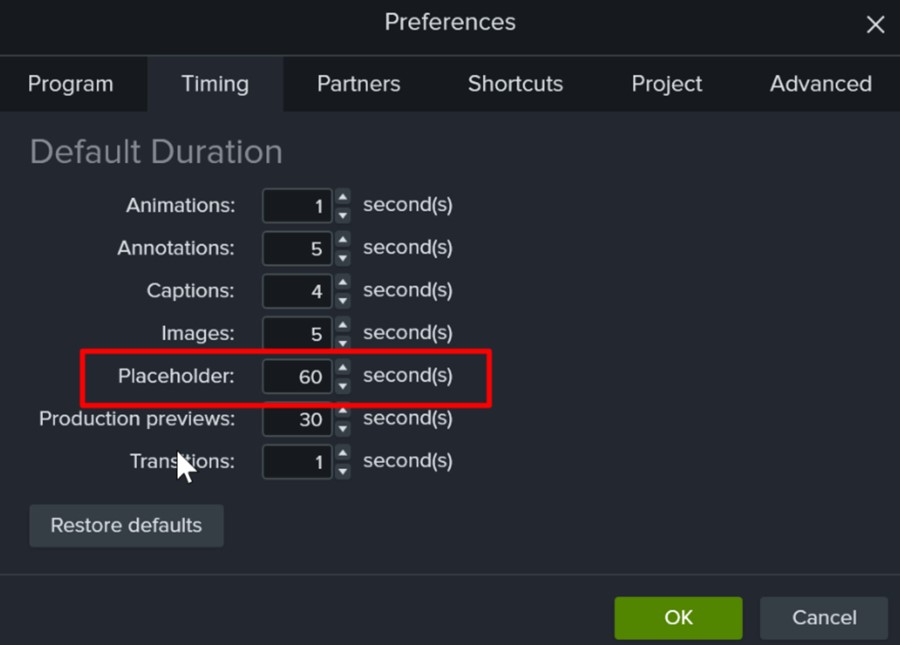
You can add default timings for Placeholders in Camtasia 2021, in the Preferences.
13. Standalone Camtasia Projects in 2021
Improved project handling in Camtasia 2021 means that you can work better with your collaborators on projects. In the past, it was quite annoying because you had the project as one file in Camtasia, and then all of the assets were all over the place.
If you were recording in one folder and you brought in videos from another folder, The pendant files were kept separate. So you could easily lose your media and move the project. And, you know, if you needed to keep things together, you have to go to the file menu and export it as a zip project. So that was an extra operation, but in Camtasia 2021, there is now an option to save a project as a standalone project.
So what this means is if I go to the file menu and save as, I can choose a name for my project stand alone project, for example. And there is now an option here to create standalone project. If I tick this box, it will save my project. And now every media file that I add into my project, like, yeah, this video, for example, and another video and another video.
So I put them on my time. Right. And so on, it will be copied to this. Standalone project folder. It's actually a folder, although you don't see it like that on disk, if you go to this or do you see standalone project .tscproj, which is the extension for a Camtasia project. This is the project that I selected.
It's two kilobytes. And if I have added now media files in this. In this project and I put it all nighttime line, I click file and save again. This time I go back to this project folder. Now the size is 19 nine megabytes for a single file. It's actually not a file. It is a folder, as it says in here. So Camtasia kind of masks everything else inside of this folder and it makes it look like a project with that extension.
But inside of this folder, all of your media files are copied. So if I double click. I go inside and I see the project itself in here and all the media files and watch what happens if I add more media to this project. So I'm going to add a picture here to my project and click save, and you will see that the file.
Has arrived in this folder here. So when you save all of the dependent media is copied inside of that folder and it's kept together without you having to do anything. And this also works with assets that you bring in from your library. So for example, if you're worried that you might be using some assets from your library that you want to share with your colleagues, when you transfer that folder over.
Well, you have to do is look, you just drag that asset into your project. Maybe it's an intro. This one happens to have a sound files and animation and my logo on it and watch what happens if I save now and I go to that folder, all of my media is right here. My logos, my song file. It has all been copied in here.
So this is great. One thing that it doesn't do is when you remove some media from your project, it doesn't actually remove it from this folder here. So watch what happens. I go to media and I delete, I delete them from my timeline and I delete them from the media being, I say, delete unused media. Now I am not using anything and I'm saving this project file.
Save. If I go back, the media is still here, but at least it keeps everything in one folder without you having to worry about it. So this is great. If you. Have a little space on your main drive or you want to keep your projects organized in a single place. All you have to do is just save your project as a standalone project.
And then when you open that and work on it and you save it, it will take care of bringing in there, all of the dependent files. So this is great.
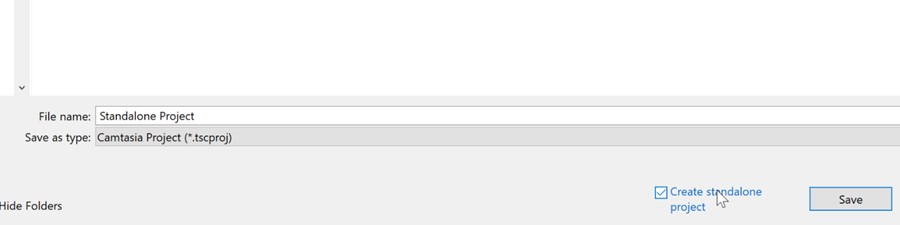
Standalone Projects in Camtasia 2021 will enable you to keep all assets and media in a single place, automatically
14. Audio Level Meter
Another feature requested by some members of the Camtasia community has been to include an audio level meter. So you can have this now. If you play an audio file, you can see this meter in the bottom-right corner showing, and it's very easy to see whether your audio is clipping or not, if the level is too high or too low, and if you click on this, it will open a sidebar here with the audio meter showing.
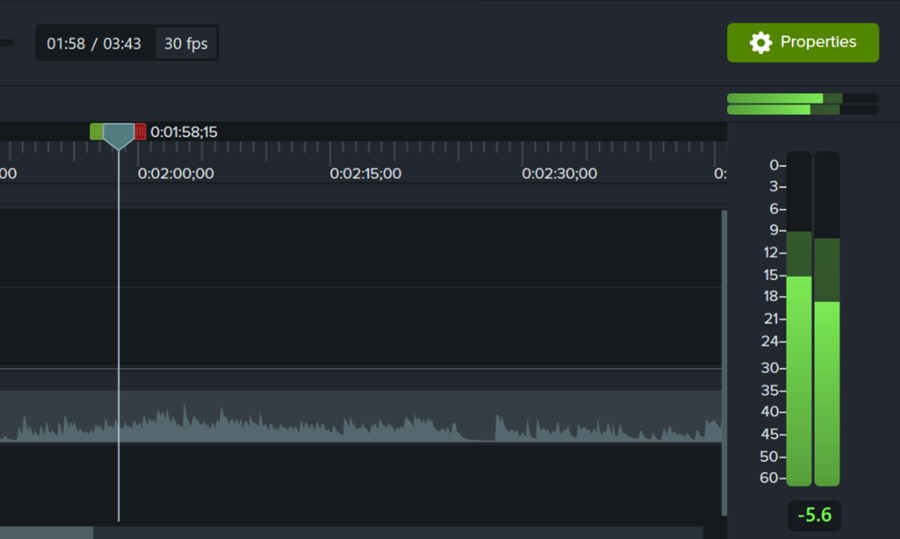
Camtasia 2021 now has an audio level meter - a feature that was requested by many users
15. Auto-normalize Audio on Individual Clips
Another improvement to audio editing has been that you now have an option to also normalize loudness on a clip basis in Camtasia 2021. So if you have more audio tracks on your project, you can choose which ones to normalize and which ones not to. Previous versions did not have this. If I'm looking in Camtasia 2020, I have an audio clip selected, I only have Mix to mono and Gain controls, but in Camtasia 2021 if I click on a clip, I have also normalize loudness.
So this is an audio track with some music. I click on another clip that has audio, I also have that option here. Again, this option was only available on a per-project basis, it's still there now, if you go to project settings, you can still have that and that works project-wide but then you can also change this for every media on your timeline that has sound.
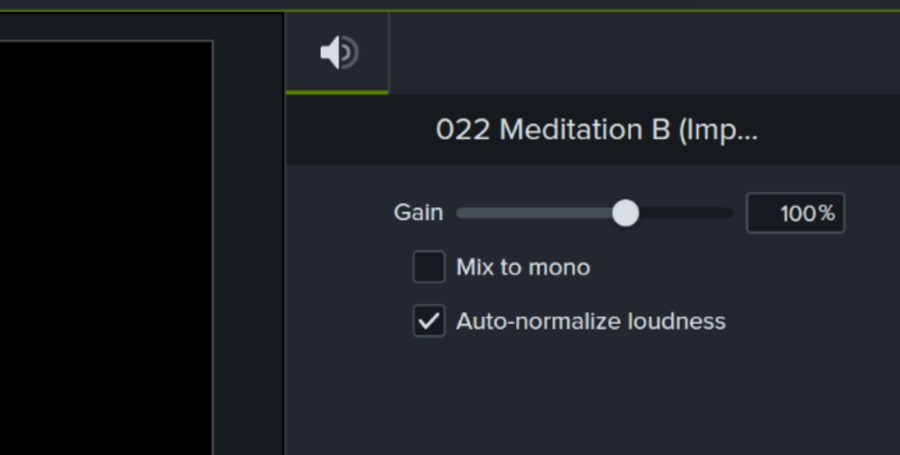
Auto-normalize loudness can be enabled now on each clip with audio, not just project-wide in Camtasia 2021
16. Auto-emphasize Audio with Auto-Ducking
Another improvement to audio editing. When you're using multiple tracks that have sound on them, maybe you have one for speech and one for music, like a background track, you can now emphasize the speech automatically using one of the audio effects that's been added in countermeasure 2021. If you go to audio effects, I have here two tracks.
One of them has a video tutorial. What I'm speaking on and the other one is an audio track, right? Watch what happens if I play both of them right now, you can't really understand the voice because the music is too loud. And just copy some of this text. That's random here. So what to do, this is the effect that's been added here in the audio effects section to emphasize the audio.
So this way you decide which track you care about the most that you need, you want to be heard like your narration or your voice. Okay. And you can automatically dock the other tracks when that track is playing. So if you have like a background track for music, you know, when you're talking, you can automatically duck that, uh, without reducing it completely.
So let me show you, I'm going to add the emphasize effect to my voice track here. And, um, let me just zoom in a bit, drag that here and now you can see that the effect was added and you have some options in the right side panel here, you can emphasize for how much, so that means to lower the volume of the other tracks, as opposed to the main track.
You can also have the ramping position on the outside for the duration or inside, which means the other tracks will lower volume depending on this option here. So. If you want the audio tracks, the music to kind of go a lower volume before you start talking, or before this actual other tracks comes in, you can keep it on the outside or if you want it to start right.
At the moment when you start speaking, you can put it on the inside. So by default, it's outside, you can round pen. You can customize the seconds, how long the duration of the ramp should be. So let's what happened. Let's see what happens here. If I'm playing just before my voice clips and just copy some of this text. So you notice that as soon as like a second before the clip came in, The volume of the music track was lowered. And let's go back to the end here. So you can adjust volume comes back up as soon as the clip ends. So this is much easier to edit like this because in the past, if you needed to achieve this effect, you had to toggle the audio points for all the other tracks. So you had to kind of double-click 4 times around the start and end of the clip and move the whole audio section down, to decrease the volume and create this ducking effect, but now you don't have to do this because this effect does it automatically when the clip that needs to be heard comes in.
And the other cool thing is if you move your clip further - earlier or later - this ducking effect goes with it, regardless of how many other tracks with audio you have playing.
So it doesn't matter where the clip is moved. The clip that needs to be heard best just moves independently and everything else has the volume doc. Before this one starts, you can obviously, you know, change the ramping and ramp out to be longer or shorter. You can also change the volume difference between the surrounding media and the main volume.
The ducking values can be from 0 to 100%, with 0 meaning no ducking at all, and 100% complete silencing of all the other tracks. 80% is the default in Camtasia.
I can see many uses for this. This is a really cool feature.
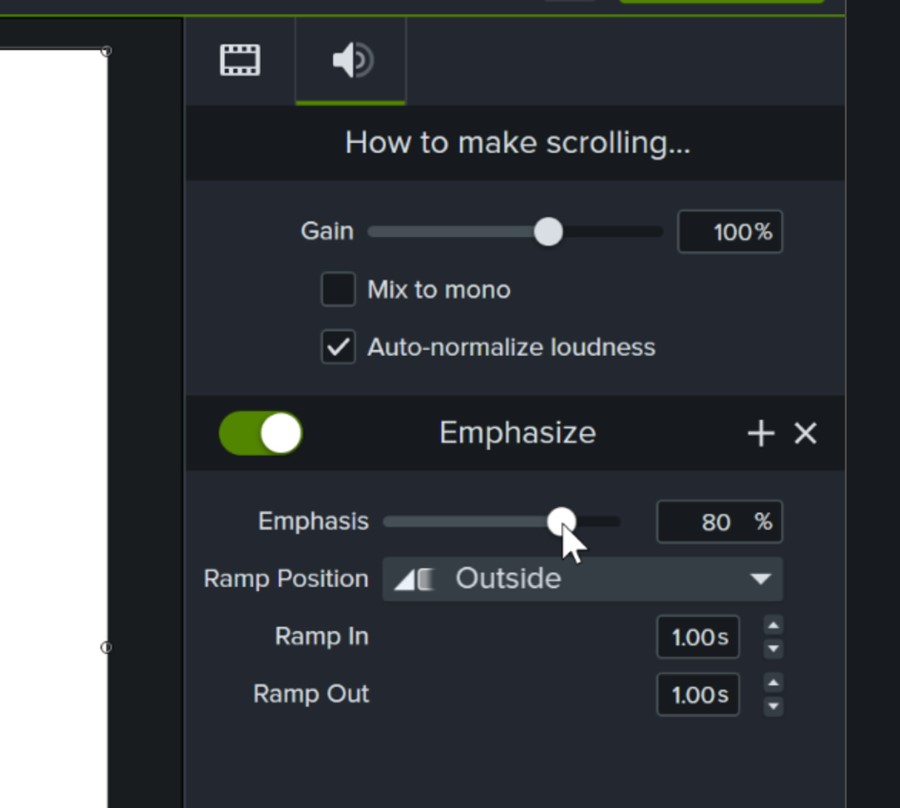
Auto-emphasize audio with auto-ducking allows you to have an audio play clearly while other audio clips have lowered volume
17. Move track and contents up or down
In previous versions of Camtasia, you could not move a track up or down on the timeline (and also its contents). If you wanted to make room for another track, you had to either insert a track or select all the content and move it to another track.
In Camtasia 2021, you can now move a track up or down as you wish, and its contents will be moved also.
Just right-click on the track header for the track you want to move and select Move > Up / Down:

You can now move tracks and their contents up or down on the timeline in Camtasia 2021
18. Enable Solo Track
If you have a lot of tracks and need to edit or see an isolated track while all the other tracks are hidden, you can now enable Solo Track with one right-click on the track header for the track you want. This will show a green background around the eye icon on the track and make all other tracks invisible. It will also now allow you to move or edit anything on the other tracks, although it doesn't actually lock them.
This shows you just that one 'solo' track in the canvas, allowing you to edit with it isolated like that.
You can even enable more than one 'solo' track and only those are shown and editable.
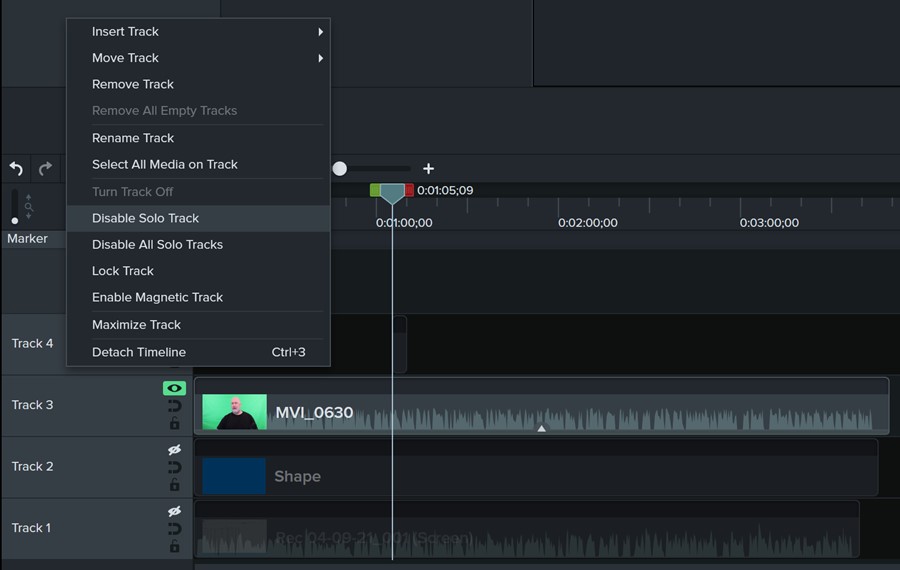
Solo track allows you to isolate and only display and edit one track, hiding and disabling all the others
19. Save colours for use later
If you need to use the same colour in more places in your project, to avoid having to use the colour picker or copy and pasting, now you can choose a colour in any colour picker and then add it to 'My colours'. This way, you can reuse them from those custom swatches:
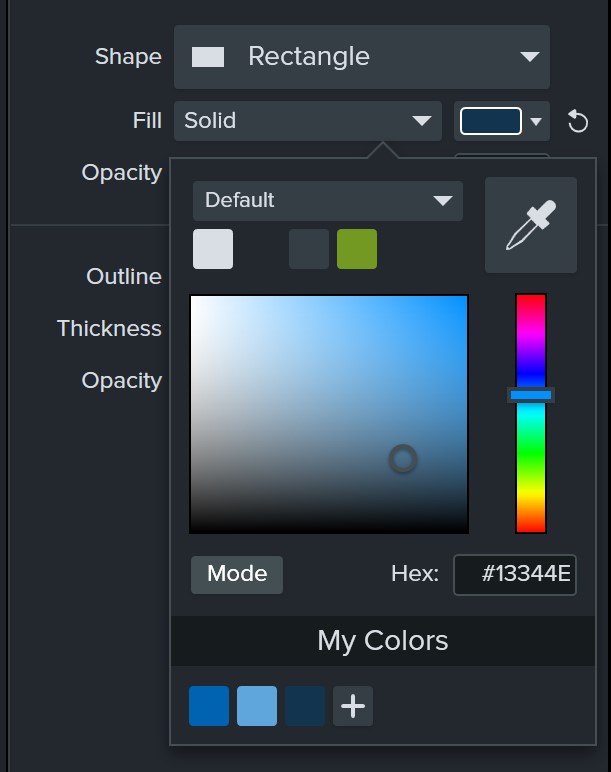
You can save colours for later use in your project
20. LOTTIE file support
Camtasia 2021 introduces support for LOTTIE files. This is a file format based on the JSON standard, that includes instructions on how to design graphics - a little bit like clipart, or SVG on steroids - but that can also be animated. These files are very small and now Camtasia supports importing them, playing around with them, animating them, just like any other clip in your timeline.
So these are some of the new features and improvements added in Camtasia 2021. Don't forget, it releases officially on the 27th of April 2021 and you will be able to check it out by downloading a free trial using this link (when it is available).
Conclusion
As a general feel, I found Camtasia much more responsive, it works faster and switches between tasks and contexts much smoother than the previous version, even while using a longer project with many clips in it. Your experience may differ, I assume it's up to your computer's configuration and performance also.
I'd love to hear your opinion on whether it's worth upgrading to this new version of Camtasia. Let me know what you think in the comments and if you have any questions, feel free to add them and I will reply as soon as possible.
How to upgrade Camtasia?
There are a couple ways to upgrade to Camtasia, one is obviously to go and buy it from Techsmith or upgrade using the maintenance plan, which is much lower in price but it gives you free updates for a year, in case Techsmith releases new versions, and it costs less than a full purchase of the software. You can get the maintenance plan at the same time as you buy your software, during checkout, or after. You can then get the latest versions as soon as they release, exclusive training and premium support.
Thank you for reading this far, if this article was useful, Like it, Share it and please subscribe to my YouTube channel for more Camtasia videos, tutorials in the next weeks as the launch date approaches.
Thank you for your time, check out some related Camtasia articles below.
Camtasia 2022: What's New?
Camtasia 2022 includes a set of new features, a TON of new assets and a bunch of new functionality that hopefully serves as a foundation for more!

Cristian
I specialize in providing clear one-on-one training in software such as Camtasia and Descript, helping you make the most of these programs.
Whether you're interested in learning how to create training videos and tutorials for your company or for YouTube, or are hoping to create your own course or start a podcast, I'm here to help you get started and give you all the shortcuts.
Categories